Rotation of 3D object using two points to determine angle

Both 2D and 3D rotation want an angle. Many times I don't know the angle.
The Manipulator allows me to visually play with the angle by looking at the far end of the item being rotated with respect to another object. I can get close, but no cigar. If I zoom in close enough to get the granularity, I can't see what I'm doing.
Is there any way with any command to specify a rotation axis or point and then go to the other end of the object and tell the command to put this point on the rotated object onto another point on a stationary object and the angle is what ever it is?
Comments
-
Sounds like you're looking for the Base Angle option of the rotate (or rotate3d if modeling in 3D) command.
0 -
I am not sure if i understood the problem, but to rotate relative to a base angle, I use dmrotate in 3d, and a little shortcut in 2d:
(defun C:RR ( / selset rpnt) (setvar "CMDECHO" 0) (if (not (setq selset (ssget "I"))) (setq selset (ssget)) ) (if selset (progn (initget 1) (setq rpnt (getpoint "\Base point: ")) (command "_.rotate" selset "" rpnt "_base" rpnt) ) ) )0 -
Denis: Before posting my question, I read the description of the 2D Rotate and had no idea what it was talking about concerning the Base Angle. I tried several experiments and nothing worked so I moved on.
Now that you've alerted me that this is what I want, I experimented some more and still no joy. I have no clue what points it's talking about and the tutorial is as clear as mud.
Knut: I'm a CAD newbie and don't read LISP. I'm still trying to just use the commands and options the product provides. That's about all my experience allows at this time. Thanks anyway.
0 -
I'm linking a youtube video about rotate in AutoCAD. The rotate command in AutoCAD works just like Bricscad, but instead of calling it Base Angle, AutoCAD calls it Reference.
https://www.youtube.com/watch?v=dS2F9sjD_qo0 -
- Rotate [enter]
- Select object(s) to be rotated
- Pick fulcrum point
- B [enter]
- Pick fulcrum point again
- Pick a point on the From lever arm
- Pick a point on the To lever arm
0 -
Denis: Thanks for the link. Now I understand what the BricsCAD docs were trying to explain.
However, that's not what I'm trying to accomplish. I'm trying to draw a steel truss.
Attached you'll see the blue C channel poorly aligned with the white C channel. I did that with the manipulator rotation facility. I got it close to what I want, but not quite.
Notice that the blue piece is poking above the white piece if you zoom in, and it's too long as it stick past the white piece.
What I want to accomplish is to have the blue top face align with the white top face at the right most point where they touch. Then I'll pushpull the blue face back to that point leaving the blue object maximum Z equal to the white object's maximum Z and overlapping the metal to provide the larges contact patch to be drilled and bolted together.
The manipulator is the only thing I've found that gets me even close, but it's idiosyncrasies can't get me to do it exactly correctly.
0 -
@RoatanBill,
I know very little about drawing in 3D, so took this as an exercise.What I did is draw a line from the pivot point to where you want the beam to finish, copied the end face of your beam and aligned it using 2D Rotate with the line I just drew, then extruded it along the path.
Probably not how you are supposed to do it, but is the end result what you needed (see attached)?
0 -
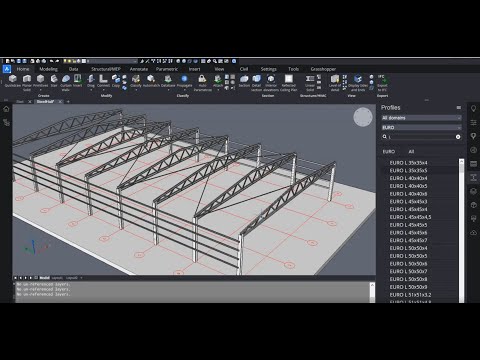
@RoatanBill
See attached movie. Is this what you want? The minimum license level you need is Platinum. Notice the widget at the bottom of the screen indicating the L-connect options which can be chosen by pressing the Ctrl key.0 -
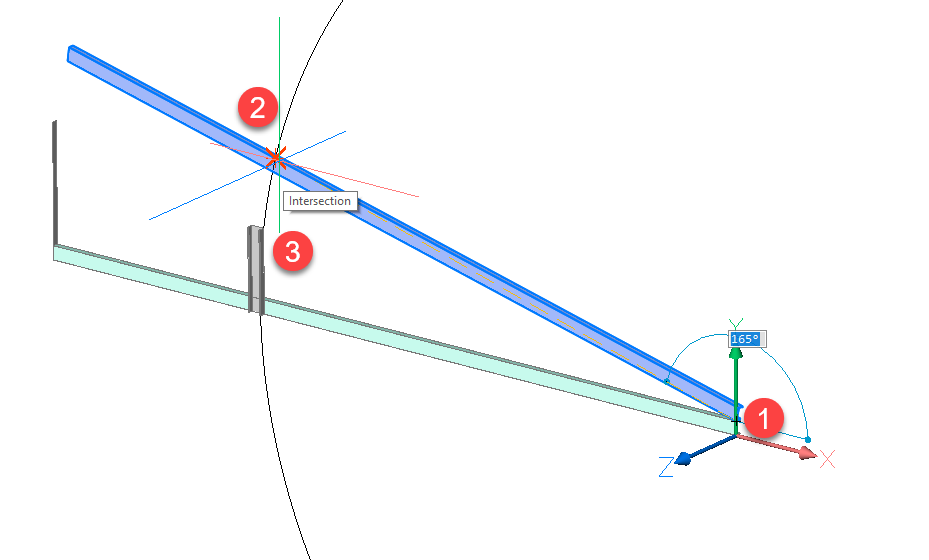
You're looking to get the rafter angle to match with the top of the vertical strut? You can use
ROTATEbase (relative), but you need to create some temporary geometry to provide the points to snap to.To do this you can create a circle centred on your rotation pivot point and radius set to the top corner of your vertical strut. Having created this you can use ROTATE make point 1 the base point, point 2 is the source point on the angled rafter where it intersects with the circle, point 3 is the target point on the top corner of the strut, which the circle also runs through.

If this isn't what you mean perhaps some sketches may help explain better.
Regards,
Jason Bourhill
BricsCAD V20 Ultimate
CAD Concepts0 -
You could also try the
ALIGNcommand. This wouldn't require construction geometry.Regards,
Jason Bourhill
BricsCAD V20 Ultimate
CAD Concepts0 -
I don't use Rotate, when the angle in degrees is not known - Align instead, in 2D. You can move as well as rotate in one operation - great.
There's 3D Align as well but I'm not fluent with that.
Oh, I see Jason's just recommended Align - can he cast any light on 3D Align?
0 -
@David Waight - That's exactly what I wanted.
Last night, as I was dozing off, I realize that rotate using Base Angle should work and that I was just interpreting the problem wrong. So, this morning I tried it with fresh insight and it worked.
The drawing in the command reference is less than useless as it gave me the entirely wrong impression. The 2 cubes in the Acad video instantly made sense but I failed to apply the knowledge correctly till this morning.
@Louis Verdonck - The playback shows some interesting intermediate results but I can't see the commands you used to do it. You also shortened the vertical, I believe, and that's not what I was after. I wanted the Blue channel to rotate down to meet the Z of that vertical.
How did you get that miter cut on the blue beam? I played the video back manually because there's no slow motion available and see you're doing things in one go that appear to be magic.
@Jason Bourhill - Your circled numbers are the points I was missing yesterday and they occurred to me late last night. The description via the command reference made no sense at all until I saw the Acad video that put it in context.
I tried the Align command once before and couldn't figure out how to work it. I'll give it another try this morning to see what it offers.
Thanks all.
0 -
@RoatanBill said:
How did you get that miter cut on the blue beam? I played the video back manually because there's no slow motion available and see you're doing things in one go that appear to be magic.It's the LConnect command that does the job. When two solids are selected, the command is available in the Quad. Repeatedly pressing the Ctrl key cycles the L-connect options.
See https://help.bricsys.com/hc/en-us/articles/360006655453-LConnect0 -
@Louis Verdonck
Thank You. I'll add lconnect to my tool set.
0 -
@RoatanBill said:
@Louis VerdonckThank You. I'll add lconnect to my tool set.
Of course you should

All that Bricscad Direct Modeling (and BIM) Features and Workflows are fantastic.I need such Webinar Videos to even recognize what all those new features
are good for and to understand how they are meant to be used.Like when and why use LCONNECT vs Structural Connect (at 38:00)
And I finally learned something about "Details"0 -
@Michael Mayer
I purchased a Platinum license, not because I understood what I was going to get, but because it wasn't the minimum and not the maximum and the perpetual license cost was something I thought was reasonable. I took a guess and it's worked out pretty well for me in my use of the product.
I don't make a penny with CAD or the welding projects I use it for. I weld for myself.
I got 9 minutes into the video and got lost. The lady is obviously a pro and you're in her league so I can understand your excitement for all the features I'm too ignorant at present to comprehend. I'm getting less ignorant every day as folks like you and others on this forum respond to my newbie questions. Thank You.
I'm excited to learn about a new primitive thing like LConnect. I wrote myself a pile of notes on how I created a miter a few months ago to make sure I could repeat the process. Now all those notes are superfluous with LConnect. Yippee!
One of these days I'll spend some time reading the entire command reference looking for other gems I can use. I've added the video you referenced to my BricsCADNotes document for future reference. I learn something new almost every day.
0 -
No Problem RoatanBill.
I think those webinars are more for intermediate and even
long term users. And the example was a even BIM video.
But beside a few special BIM extensions, the large amount
of Direct Modeling Tools should be already included in
Platinum and even free Shape.I started learning Bricscad from the short Shape Videos.
These give a base of knowledge and a feeling for the App.
About a minute video for a single tool. For me such videos
are entertainment. I watch all videos, even ones unrelated
for me.
I hope that when I come in such a situation while working,
that I will remember that I have seen a Video with that guy
doing something like that and that I will find the video again.
Just to have something in the back of my mind.The problem is that is easy to reproduce a video project
but much harder to work on an own project. Suddenly some
tools do not work as expected anymore.
Or once a tool works for you, you will use it that way forever,
without knowing that you may use it wrong or wasting lots
of potential.
That is where the Webinars are great as they also show why
to prefer that tool or this workflow over another in that
special situation.
Also you may see lots of things that you never expected to
be possible or unknown features that could be useful for
me one day.But I am a visual guy, others may prefer text books, PDFs
or even the Help Documentation over videos for learning.0 -
@Michael Mayer
I'm a documentation guy.
The one thing missing from BricsCAD is rudimentary documentation, like a real users manual full of examples for using the various commands.
The best technical documentation I ever encountered was Microsoft's DOS C compiler language manual. They covered every command with numerous examples and situations where using the command made sense.
The BricsCAD command reference reads like a dictionary. Yes, it describes the command but lacks context. If you don't already know how to use the command and in what situation it applies, then you're left scratching your head.
As a professional software developer, I wrote lots of documentation for products that cost tens to hundreds of thousands of dollars for mainframes. The documentation was provide to clients to allow them to answer their own questions or for my tech support team to refer someone to a specific section. BricsCAD documentation is scattered all over the place and assumes an already knowledgeable end user. The documentation is absolutely the worst feature of the product.
0 -
@Tom Foster said:
I don't use Rotate, when the angle in degrees is not known - Align instead, in 2D. You can move as well as rotate in one operation - great.There's 3D Align as well but I'm not fluent with that.
Oh, I see Jason's just recommended Align - can he cast any light on 3D Align?
I checked, and this scenario ALIGN won't work, not without also creating some construction geometry.
With 3D objects ALIGN works by aligning 3 source points to 3 target points. You can visualise it by imaging that you are aligning two planes to each other, with each plane described by 3 points, an origin followed by two direction vectors. The first point is the critical one, as this describes the origin of the plane. What ever point you pick as the source will exactly align to the target. The next two points are used to define direction vectors. These are used to align the source object to the target, the source points won't necessarily match the target, but should lie on the same imaginary axis.
Regards,
Jason Bourhill
BricsCAD V20 Ultimate
CAD Concepts0


 https://www.youtube.com/watch?v=rV_F8XcGWjk&list=PLONdQc9bizsfzuES9MrwxUEH9M4PPfyRm&index=9&t=0s